
Introduction
Arducam has revolutionized camera solutions for Raspberry Pi and embedded systems, offering everything from basic camera modules to advanced multi-camera setups and high-resolution sensors.
What You'll Learn
- How to connect and configure Arducam cameras on Raspberry Pi
- Software setup with libcamera and OpenCV
- Capturing still images and video streams
- Building computer vision projects
- Multi-camera configurations
Whether you're building a security camera, time-lapse system, or machine learning application, this guide covers everything you need to get started with Arducam on Raspberry Pi.
Arducam Camera Options
| Camera Model | Resolution | Sensor | Best For |
|---|---|---|---|
| Arducam 5MP OV5647 | 5 MP (2592×1944) | OV5647 | Basic projects, learning |
| Arducam 8MP IMX219 | 8 MP (3280×2464) | Sony IMX219 | General purpose, video |
| Arducam 12MP IMX477 | 12.3 MP (4056×3040) | Sony IMX477 | High quality, interchangeable lens |
| Arducam 64MP Hawk-eye | 64 MP (9152×6944) | OV64A40 | Ultra-high resolution |
| Arducam NoIR | Various | No IR filter | Night vision with IR LEDs |
Browse our complete Arducam camera collection for all available models.
Hardware Setup
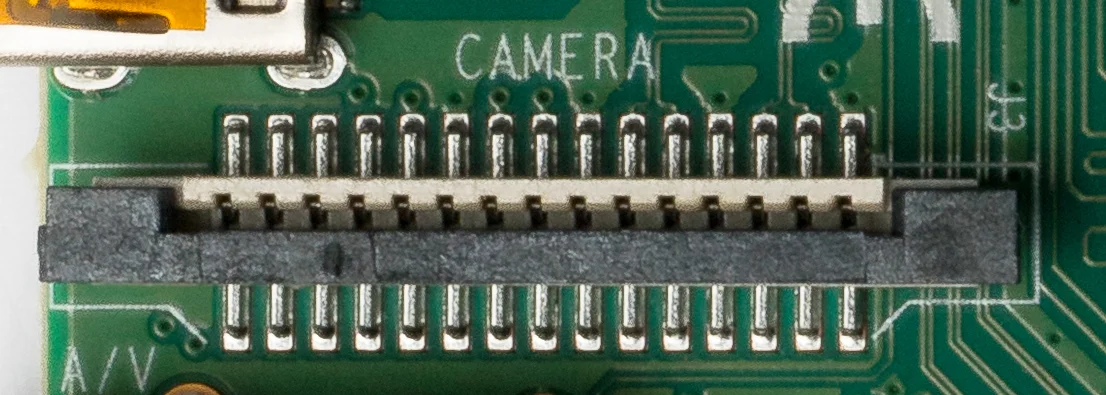
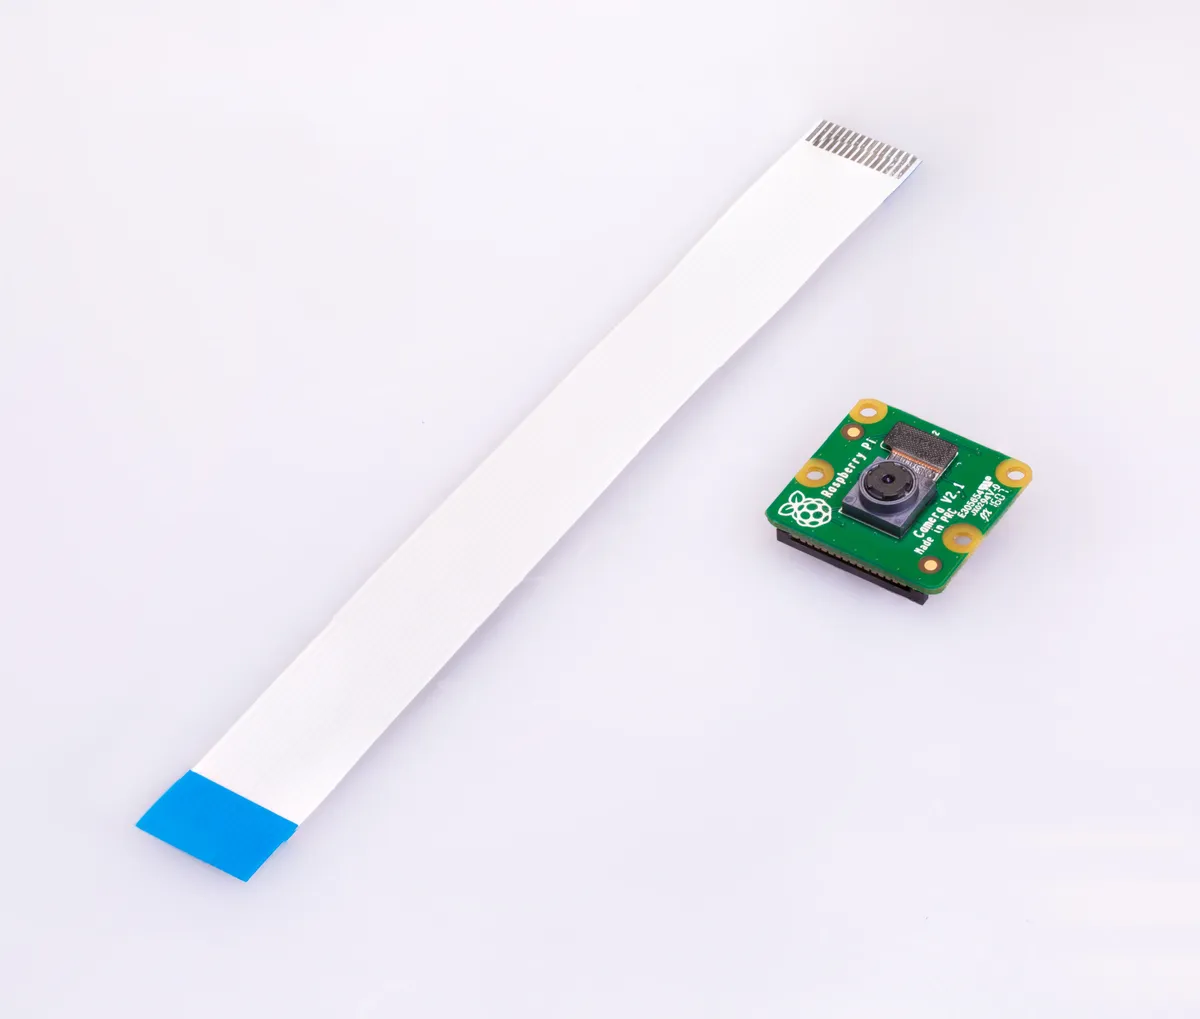
Connecting the Camera
Important
Always power off your Raspberry Pi before connecting or disconnecting the camera. The CSI connector is delicate!
- Power off your Raspberry Pi completely
- Locate the CSI camera port (between HDMI and audio jack on Pi 4)
- Gently pull up the plastic clip on the connector
- Insert the ribbon cable with blue side facing the Ethernet port
- Push the plastic clip back down to secure the cable
- Power on the Raspberry Pi
Software Configuration
Enable Camera Interface
On Raspberry Pi OS, enable the camera using raspi-config:
sudo raspi-config
# Navigate to: Interface Options → Camera → Enable
# Reboot when prompted
Install Required Packages
# Update system
sudo apt update && sudo apt upgrade -y

# Install libcamera (modern camera stack)
sudo apt install -y libcamera-apps

# Install Python libraries for OpenCV
sudo apt install -y python3-opencv python3-picamera2

# Verify camera detection
libcamera-hello --list-cameras
Success Check
If you see your camera listed with model information, the hardware connection is correct!
Capturing Images and Video
Basic Commands (libcamera)
# Preview (5 second display)
libcamera-hello -t 5000

# Capture still image
libcamera-still -o test.jpg

# Capture with custom resolution
libcamera-still -o hires.jpg --width 4056 --height 3040

# Record video (10 seconds)
libcamera-vid -t 10000 -o video.h264

# Time-lapse (capture every 5 seconds)
libcamera-still -t 60000 --timelapse 5000 -o image%04d.webp
Python with Picamera2
from picamera2 import Picamera2
import time

# Initialize camera
picam2 = Picamera2()

# Configure for still capture
config = picam2.create_still_configuration()
picam2.configure(config)

# Start and capture
picam2.start()
time.sleep(2) # Allow auto-exposure to settle
picam2.capture_file("photo.webp")
picam2.stop()

print("Image captured: photo.webp")
Computer Vision Projects
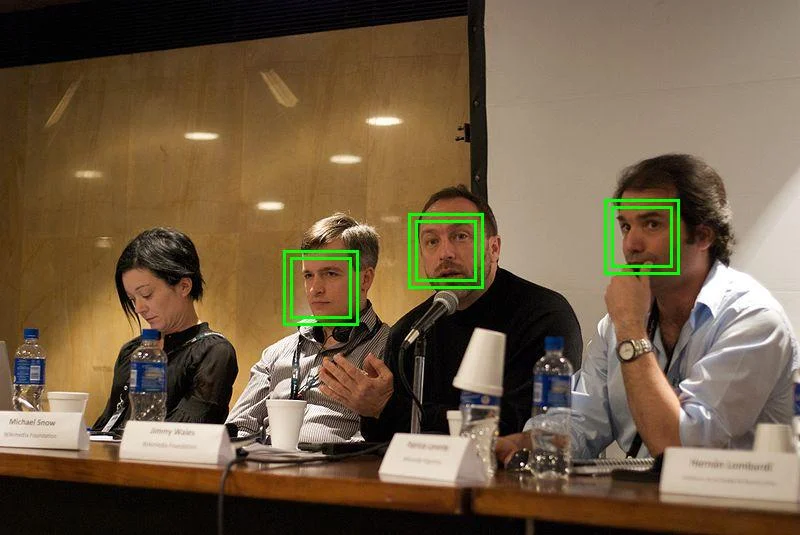
Real-time Object Detection with OpenCV
import cv2
from picamera2 import Picamera2

# Initialize camera
picam2 = Picamera2()
picam2.configure(picam2.create_preview_configuration(
 main={"size": (640, 480)}
))
picam2.start()

# Load face detection model
face_cascade = cv2.CascadeClassifier(
 cv2.data.haarcascades + 'haarcascade_frontalface_default.xml'
)

while True:
 # Capture frame
 frame = picam2.capture_array()
 gray = cv2.cvtColor(frame, cv2.COLOR_BGR2GRAY)

 # Detect faces
 faces = face_cascade.detectMultiScale(gray, 1.1, 4)

 # Draw rectangles
 for (x, y, w, h) in faces:
 cv2.rectangle(frame, (x, y), (x+w, y+h), (0, 255, 0), 2)

 cv2.imshow('Face Detection', frame)
 if cv2.waitKey(1) & 0xFF == ord('q'):
 break

cv2.destroyAllWindows()
picam2.stop()
Multi-Camera Setup
Arducam Multi-Camera Adapter
Arducam offers a Multi-Camera Adapter that allows connecting up to 4 cameras to a single Raspberry Pi, switching between them programmatically. Perfect for:
- 360° panoramic capture
- Stereo vision depth mapping
- Multi-angle security systems
- Quality inspection stations
Troubleshooting
"No cameras available"
- Check ribbon cable is fully inserted and secure
- Verify blue side faces Ethernet port
- Run
sudo raspi-configand enable camera - Reboot after enabling
Image is dark or washed out
- Add
time.sleep(2)before capture for auto-exposure - Adjust exposure manually with
--exposureflag - Check lighting conditions
Focus issues
- OV5647/IMX219 have fixed focus - ensure subject at correct distance
- IMX477 (HQ Camera) requires manual lens focus adjustment
- Some Arducam models have motorized autofocus
Project Ideas
Home Security
- Motion-triggered recording
- Face recognition access
- Remote monitoring via stream
Garden Monitor
- Time-lapse plant growth
- Wildlife camera trap
- Weather-proof NoIR setup
Machine Learning
- Object classification
- Gesture recognition
- Quality control inspection
Content Creation
- Document scanner
- Webcam for streaming
- Microscope adapter
Ready to Start?
Check out our complete Arducam collection for cameras, lenses, and accessories.
For more advanced projects, see our guides on object detection and machine learning with Raspberry Pi.
Frequently Asked Questions
What is the difference between Arducam and the official Raspberry Pi camera?
Arducam cameras offer several advantages over official Pi cameras: higher resolution options (up to 64MP vs 12MP), interchangeable M12 lens system, specialized sensors (global shutter, IR, ToF), multi-camera support through multiplexers, and a wider range of models for specific applications. While Pi cameras are excellent for basic projects, Arducam excels in professional and specialized computer vision applications.
How do I enable the Arducam camera on Raspberry Pi?
First, physically connect the camera to the CSI port with the FFC cable (contacts facing the correct direction). Then enable the camera interface using 'sudo raspi-config' under Interface Options > Camera. For certain Arducam models, you'll need to install specific drivers and add the appropriate device tree overlay to /boot/config.txt. After rebooting, verify detection with 'vcgencmd get_camera'.
Can I use multiple Arducam cameras on one Raspberry Pi?
Yes! Arducam offers multi-camera adapter boards that allow connecting 2, 4, or even more cameras to a single Raspberry Pi. This requires using the Arducam multiplexer hardware and specific software to switch between cameras. This capability is essential for stereo vision, 360-degree monitoring, and multi-angle capture applications. Check our multi-camera setup guide for detailed instructions.
Which Arducam model is best for robotics applications?
For robotics, we recommend Arducam's global shutter cameras (like the OG01A1B or OV9281 models). Global shutter sensors eliminate motion blur when capturing fast-moving objects, crucial for autonomous navigation and object tracking. Pair with a wide-angle lens for broader field of view, and consider the ToF camera for depth sensing and obstacle detection.
How do I improve image quality with my Arducam camera?
To optimize image quality: 1) Remove any protective film from the lens, 2) Manually focus the lens if it's adjustable, 3) Configure manual exposure and white balance settings in your code instead of relying on auto-exposure, 4) Ensure adequate lighting for your scene, 5) Increase GPU memory allocation to at least 256MB, and 6) Use the highest quality settings your application allows (resolution, bitrate for video). Also verify the FFC cable is properly connected without damage.